How to: Extract building heights from LiDAR data and make 3D buildings

Screen Shot 2015-09-25 at 11.19.00

The Environment Agency recently released their LiDAR as Open Data meaning it is now free to use and without restrictions. You can read a bit more about that here.

For those unfamiliar, LiDAR, which stands for Light Detection and Ranging, is a technology which involves firing a laser at a feature (usually the ground from a plane) and analysing the reflected light. The timing and pattern of the reflected light returned can be used to determine distance and type of feature scanned. A typical LiDAR system can scan hundreds of thousands of points a second producing incredibly detailed models of terrain, buildings, cars or whatever else they are pointed at.

The LiDAR data released by EA comes in 2 flavours:

  • DSM – Digital Surface Model
  • DTM – Digital Terrain Model

The DSM is exactly what you see on the surface of the earth with your own eyes; so depending on the resolution, this will include all man made features such as buildings, cars, infrastructure and so on as well as all the natural features such as vegetation.
The DTM is derived from the DSM where all the surface features (buildings, trees etc) have been stripped out leaving just the bare terrain.

Each product has it’s own uses, but one of the benefits of having access to both is the ability to extract the surface features by comparing the two datasets.

This is what I set out to do using some data I downloaded for the Bath area – it was surprisingly straightforward.

This is the end result:


Full screen version

For the step by step details…

Read more ›

Posted in GIS

OSMC Final release is out now (and how I upgrade)


Posted in Raspberry Pi

How To: Install Hyperion on a Raspberry Pi running OSMC


Tagged with: , , ,
Posted in Raspberry Pi

Bath:Hacked 2.1 and HistoryMap

bathalerts

I recently took part in Bath:Hacked 2.1, a hackathon where 50 ish people were locked* in a room for 36 hours with a bunch of open data and asked to produce something useful or interesting to the people of Bath.

This was actually my second Bath:Hacked event, the first resulted in this: http://nadnerb.co.uk/bathhacked/ – an interactive map displaying rates of recycling in Bath and North East Somerset.

At the 2.1 event my team created BathAlerts – an email alert service which keeps you informed of any planning applications, crimes or house sales in your local area. It will even send you an instant email alert should the Environment Agency issue a flood alert in your local area. You can try out the service here: bathalerts.bathhacked.org and read more about it here.

It was a great 2 days, I learnt a lot particularly the backend side of things and using GitHub to work on a coding project as part of a team.
One of the more difficult parts of the event was actually deciding on an idea. I think we spent the first 3 hours brainstorming and came up with about 4-5 ideas before settling on BathAlerts.

Feeling inspired after Bath:Hacked I decided to follow up on one of these shortlisted ideas – using the historical mapping datasets recently added to the datastore to explore Bath’s past.

I wanted to produce something from scratch and finally get to grips with CSS to produce a nice responsive design.
The result is HistoryMap – a web app that allows you to easily explore and compare 8 historical maps ranging from the 1500’s to the 1940’s.

Screen Shot 2014-11-12 at 20.36.35

I’m pretty happy with the results, it works well on mobiles, tablets and laptops – each with a slightly different design and functionality.
For best performance though I would recommend Chrome on a desktop/laptop.

I hope to add more relevant datasets and maps as and when I find them, as well as extend coverage to other areas.

And finally, a big thanks to everyone at Bath:Hacked for sourcing the data, especially Leigh Dodds for doing the hard work of georeferencing all the maps!

* not really


Tagged with: , , ,
Posted in GIS

More DIY GoPro projects

After putting together my DIY GoPro grip I’ve been thinking up more DIY mounts to add to my growing collection of GoPro mounts! Here’s two of my latest additions.

First up we have a pole, similar to a GoPole Reach… but without the extra reach.
DIY GoPole
It was a very straightforward build:

  • Get some PVC pipe that’s 22mm in diameter
  • Cut to size
  • Add a mountain bike handlebar grip to one end
  • Add a GoPro handbar mount to the other end

For a more detailed look, plus some extra ideas, I’ve put together a quick how to video here:

The second DIY project is a modification of the popular Ikea egg timer timelapse mount.

Sitting this thing on the ground with a mount and camera on top can be a bit unstable, especially in the wind. The solution is a mini tripod.
To mount the timer on the tripod I drilled a 6mm hole in the bottom of the timer using a Dremel (no need to take the timer apart). I then tested the hole with the tripod screw, it was slightly too small so I used a sanding tool to carefully enlarge the hole. It may take a few attempts of sanding but once the screw starts to ‘take’ it will thread the metal and the plastic underneath giving you a secure fit. No need for screw tap sets!


Obviously this mini tripod can be removed and the timer can be placed on a full sized tripod or any device with a male tripod attachment.

Posted in GoPro

MapInfo MapHero winner!

mapforfun
Last month I entered my GPS running route map of Bath into the MapInfo MapHero competition.

I entered the map into the “Map for Fun” category and was surprised to hear I won first prize, a Microsoft Surface tablet! Pretty chuffed with that since the last competition I won was a colouring in competition at primary school -which is kinda what I did here too.

The map consists of around 1,000 crowd sourced running routes which I scraped from MapMyRun.com. The routes, originally in KML format, were converted into MapInfo TAB format and laid on top of the city of Bath boundary which was sourced from Ordnance Survey’s Boundary-Line OpenData.

That’s all there was to it really – not bad for a few hours work 😀

An interactive version can be found here http://nadnerb.co.uk/map/

Posted in GIS

Tile server basemaps for MapInfo

Ever needed a stylish basemap to display under some map data but have no idea where to look or how to even get it into MapInfo?

Well worry no more, try this:

basemaps

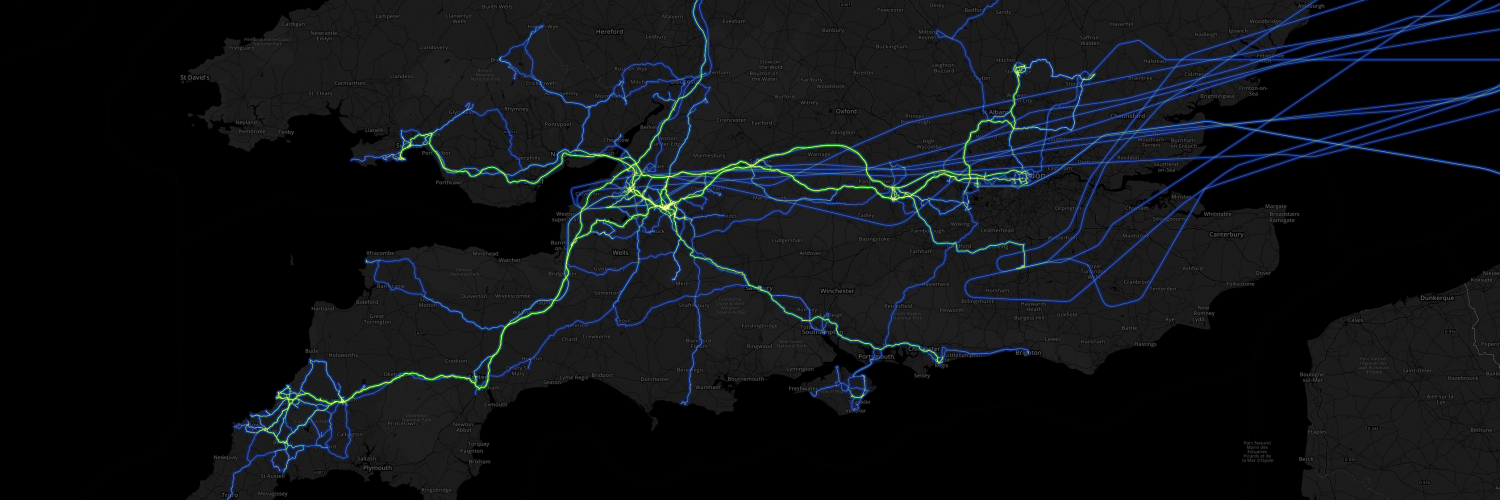
With the click of a button you can quickly add one of many stylish and freely available basemaps to your map.

The basemaps come from various providers in tile format which with a bit of MapBasic can be converted into TAB files. I have selected a few of my favourites from this rather large list of basemaps and added them to a handy toolbar menu.
The menu is based on the excellent dynamic XML menu example by James Moloney. This means you, the user, can easily add or remove basemaps from the menu by editing a simple XML file.

Usage:

Download, extract the zip file and run the MBX in MapInfo 10.5 or above.
You’ll now have a ‘Basemaps’ option on the toolbar, so get clicking!

The only thing you need to be aware of is there must be a folder called ‘TABs’ in the same directory as the MBX. This is where the TAB files are created so will fail if it doesn’t exist. You can take copies of or move these TABs and they will still work without this basemaps tool.

To add or remove basemaps from the menu, edit Basemaps.xml and then re-run the tool. Hopefully the structure is self explanatory.
You can find all the values you need as well as seeing a preview of each basemap here.

Any issues, leave a comment below.

Licensing:

The tool is released under the GNU GPL license so is free to copy, modify or distribute however you please.
All basemaps are free to use and should already include all the correct attribution for use in MapInfo. Please check with the individual providers if you plan to print or distribute the maps to ensure you’re not in breach of their licensing agreements.
HERE and Esri maps require registration to use, please see here for more info.

Download:

Due to changes in MapInfo 12.5, there are now 2 versions of the tool:

Includes sourcecode, compiled MBX (v9.5) and config XML file.

Includes sourcecode, compiled MBX (v12.5) and config XML file.

Known issues / limitations:

– Tile Server support was added in v10.5 of MapInfo. Therefore, while the tool may run in older versions, you will not be able to open any of the basemaps/TAB files.

– Some basemaps at certain zoom levels are pixelated. This is related to the tile height setting, the size of the MapInfo map window and the particular basemap you are using. You can modify the tile height setting in the sourcecode and recompile but I found ‘230’ seemed to give ok results for most maps. I also noticed resizing the map window seemed to improve the quality too.

– Some basemaps seem to be missing tiles at certain zoom levels. Not much can be done about this besides try a different zoom level or a different basemap.

– Some basemaps give an error at certain zoom levels. This means there are no tiles at this level. Why MapInfo returns an error while for other basemaps it simply displays no basemap, I don’t know.

– The OpenWeatherMap layers appear black. This is because MapInfo doesn’t deal with transparency unless you tell it to: Layer Properties > Style override > Transparent.

– Messy code, haha. Could do with a tidy up and more comments, but that’s what v1.1 is for.


Posted in GIS, MapBasic

How to build a GoPro battery grip


So you wanna build a GoPro battery grip? Well you’ve come to the right place! Why pay £40 for an off the shelf battery and grip when you can make one yourself with 3x the battery life for less than half the price? You may already have some of the required parts so could work out even cheaper!

comparison

All these parts you need can be found on eBay:

I’ve made a video to show you guys how all the parts go together, it’s pretty straight forward.

Give it a go and let me know how it goes!


http://test.skimlinks.com/

Posted in GoPro, Other

Where has everything gone?

Well it appears my blog and all its content has vanished!
If you’re looking for a particular post then please check back in a day or 2 when I will have hopefully restored everything from a backup.

Cheers.

Posted in Other

How to: turn Hyperion on/off using your TV remote.


Posted in Raspberry Pi